Showing posts with label ginger. Show all posts

Wednesday, September 28, 2011

Three Cup Chicken


My husband and I have been living at our current apartment for over two years and not once has it occurred to me to start a herb garden. We don't have any land with our apartment but we do have a north facing balcony that gets plenty of sunshine.

While I was at the shops a few weeks ago I had a revelation: packaged parsley cost $2.99 while a potted plant was only $3.49. For 50 cents extra I could have my very own fresh plant and avoid buying a large amount in a package that would just get wasted anyways. What haven't I started a garden sooner???

So I've been slowly collecting various herbs and veggies and growing them on our balcony, and so far we have parsley, mint, thyme, basil, spring onion, rosemary, tomato, cos lettuce, and lavender. I've been having a blast gardening, and yesterday I went down to our local plant shop to pick up a few more pots. As I was leaving, the shop owner asked me if I'd like some free Thai basil, as he had too much and needed to get rid of it. I've never even heard of it before, but of course I took some home and immediately started looking up recipes.

Thai basil is completely different to basil, and it has a sweet licorice flavour to it. It's used quite often in Asian dishes, and after some searching I found one that looked super yummy and would use up a fair amount of my Thai basil.

This three cup chicken recipe is very simple and quick, and most importantly full of flavour. (It's called 'three cup chicken' because of the equal parts of soy, dark soy and wine.) The key to getting the chicken soft and tender is to use baking soda. After you have cut up the chicken thigh into bite size pieces, sprinkle a good amount of baking soda over the surface of the meat and place into the fridge for 15 minutes. This simple step makes the chicken so tender it will melt in your mouth! You can use this trick for pretty much any meat, just be sure to rinse all traces of baking soda off of the meat before cooking, otherwise it won't taste very nice.

Some of the other ingredients, such as the Chinese rice wine or the dark sesame oil may not be available at your local supermarket, but if you live in a city, try going to an Asian grocery store. Most will have all of these ingredients, or they will know where you can find them. Finally, do not substitute the Thai basil for regular Italian basil. It won't work and the taste will be completely off.


Three Cup Chicken
serves 4

Ingredients
500 grams or 1lb boneless skinless chicken thighs
5 slices of fresh peeled ginger
5 garlic cloves, peeled
2 tbs dark sesame oil
1 1/2 tbs soy sauce
1 1/2 tbs sweet dark soy sauce (also known as Kecap Manis)
1 1/2 tbs Shaoxing wine (also known as Chinese rice wine, or Chinese cooking wine)
1 tbs water
A large handful of Thai basil leaves
1 tbs baking soda (to tenderize chicken)
Cooked rice, to serve

Method
1. Cut up the chicken thighs into bite size pieces and rub generously with baking soda. Place into a bowl, cover, and put into the fridge for 15 minutes.
2. Remove chicken from the fridge and completely rinse off the baking soda with cold water. Pat chicken dry and set aside.
3. Heat a wok or deep frying pan on medium high heat and add the sesame oil. Add the garlic and ginger and cook, stirring, until fragrant (1-2 minutes).
4. Add the chicken and stir to coat with the oil.
5. Add the soy sauce, dark soy sauce, wine, and water and stir well to combine. Cover, and leave to simmer on a lower heat for 5-7 minutes.
6. Add fresh Thai basil leaves and stir for a further minute.
7. Serve immediately on a bed of steamed rice.

Wednesday, September 21, 2011

Nana's Pumpkin and Walnut Bread


One of my favourite childhood memories is going to my Grandma's house. Nana, as I used to call her, would always have something delicious baking or a plate of fresh cookies waiting for me. I was so excited whenever I got to help her bake, whether it be rolling out cinnamon buns or gathering blackberries for a pie. And of course, anything Nana baked was always perfect.


When my Nana passed away her recipe book was given to my Aunt, and I've recently received a photocopied version of it. It's full of handwritten recipes for baked goods, quick and easy dinners, side dishes, fried pastries and everything else. Some recipes I can remember her baking and some I can't, but they all sound amazing anyways and I'd love to eventually attempt each one.

This pumpkin bread recipe is taken directly from my Nana's recipe book, just as she had written it (I've only added directions). She doesn't specifically say what type of nut to use, but it most likely would have been walnuts. Also, we don't have canned pumpkin here in Australia so I've made my own puree, which is very simple (directions below). This bread is moist and full of flavour, and tastes even better while still warm with a generous spread of butter.


Ingredients
1 cup brown sugar
1/2 cup white sugar
2 cups plain flour
1 tsp baking soda
1/2 tsp nutmeg
1/2 tsp cinnamon
1/4 tsp ginger
1/2 cup walnuts, roughly chopped
1 cup pumpkin puree (fresh or canned)
1/2 cup vegetable oil
1/4 cup water
2 eggs, lightly beaten

Method
1. Preheat oven to 175 degrees Celsius, or 350 degrees Fahrenheit.
2. Sift together all dry ingredients into a large mixing bowl.
3. Add the chopped nuts and stir to combine.
4. Add pumpkin puree, oil, water and eggs to the dry ingredients and mix until well incorporated.
5. Pour pumpkin batter into a lightly greased bread pan and bake for 60 minutes.
6. Serve warm with a generous amount of butter.

To make your own Pumpkin Puree
1. Chop or peel away pumpkin flesh from the outer skin. Remove and discard pulp.
2. Boil in a pot of water until pumpkin is soft.
3. Drain the pumpkin. Return to the pot and mash until smooth.

Tuesday, September 13, 2011

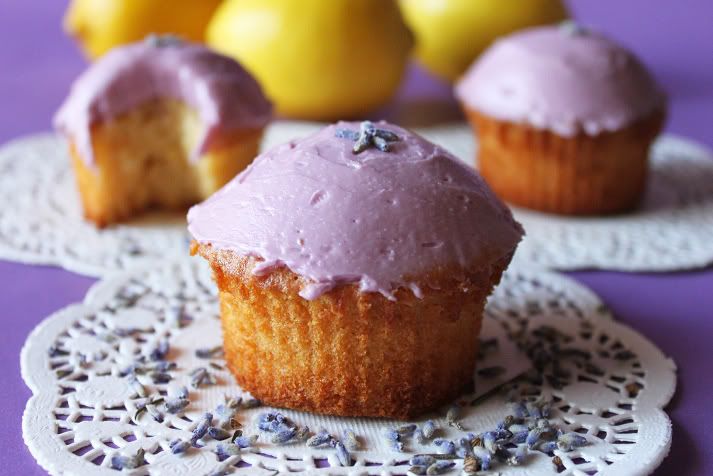
Lemon, Ginger and Honey Cupcakes with Lavender Buttercream Frosting

Photobucket

I can't think of a better way to start off my brand new blog than with a cupcake recipe!

I had been dreaming of making a lavender infused dessert ever since my husband and I took a trip to the Ashcombe Lavender Maze back in February. We stopped there for tea, and they served us these delicious little butter cookies with chunks of lavender all throughout. I had never thought of eating lavender before, and I was a bit hesitant at first, but the flavour is SO unique and delicate and just sings of spring time.

Photobucket

While shopping at the markets a few days ago I spotted some culinary lavender buds and immediately set to work creating a recipe. I love the combination of lemon, honey and ginger, so after a few adaptations from a buttercake recipe found here, I had some lovely springtime cupcakes that are soft and buttery, and so delicate and light! The ginger compliments the lavender so well, and I'm very pleased with the results. I think in the future I may add a bit more ginger (just because I love it). The recipe is below, and you can make it into a cake as well if you prefer. Simply just use a 9 inch round pan and bake for a further 20-25 minutes.


Ingredients

Cupcakes
225 grams butter
130 grams + 45 grams caster sugar
2 tbs honey
Zest of 1 large lemon (or 2 small lemons)
2 tsp ground ginger
5 egg yolks
200 grams plain flour
1 ½ tsp baking powder
5 egg whites


Lavender Buttercream Frosting
200 grams butter, softened
2 cups icing sugar (powdered sugar)

½ cup whole milk
1 tsp lavender buds, or culinary lavender
Purple food colouring (gel or powder)

Method
1. Preheat oven to 160C. Line a cupcake tin with cupcake papers.
2. Beat the butter, 130 grams sugar, honey, zest, and ginger on medium speed for 5 minutes.
3. Drop in egg yolks one at a time, beating well after each addition.
4. Sift flour and baking powder and mix into the batter.
5. In another bowl, beat egg whites until foamy. Gradually add in 45 grams sugar and beat until stiff glossy peaks.
6. Gently fold egg whites into batter, making sure to incorporate everything without over mixing.
7. Spoon cupcake batter into paper filled tins until ¾ full leaving a small space at the top for cupcakes to rise.
8. Bake for approximately 20 minutes or until toothpick comes out clean and cupcakes are a golden colour.
9. Let the cupcakes rest in the tin for 5 minutes, then carefully remove and place on wire rack to cool.


For the Lavender Buttercream
1. Place ½ cup milk into a small saucepan with lavender and bring to a boil. Remove from heat.
2. Cover the pan and let it sit for 15 minutes so that the lavender infuses with the milk.
3. Pour lavender milk into a cup and place in the refrigerator for a further 30 minutes to cool.
4. Remove milk from refrigerator and strain to remove lavender buds. Set milk aside.
5. Beat butter and sugar together until the butter starts to turn a creamy ivory colour (approx. 5 mins).
6. Add half of the lavender milk and purple food colouring and mix to combine.
7. Taste frosting; add more lavender milk or sugar if needed.
8. When cupcakes have cooled, frost generously with lavender frosting. Enjoy with some Earl Grey tea... yummy!