Friday, November 25, 2011

Happy Thanksgiving!


 We celebrated Thanksgiving a bit early on Wednesday this year. And because I love Christmas so much, we made it an early Christmas dinner as well and invited our friend over to celebrate with us since he won't be in Melbourne for the holidays. Here are a few pics from our yummy feast!


Our table all set up and looking pretty!


One of our first courses: roasted pears stuffed with goats cheese, wrapped in prosciutto and served with a rocket and toasted walnut salad with a lemon honey dressing


We don't have turkeys out in the supermarkets yet here in Oz, so we settled on a 2.2 kilo free range chicken instead! Stuffed with lemon, thyme and rosemary.. yum!


And for dessert: a platter with sea salt caramels, my Nana's Christmas honey cakes, and chocolate chip cookies. All washed down with some homemade boozy eggnog! (recipe posted in the coming days).


I'm thankful for my wonderful husband and for my family and friends near and far. I hope you have a wonderful Thanksgiving (if you celebrate it!), and don't go too crazy with those Black Friday deals ;)

Tuesday, November 22, 2011

Sea Salt Caramels


I don't think I ever actually had salted caramels when I was younger, but I do remember getting a container of caramel popcorn for Christmas one year and thinking s
weet + salty = the best combination ever. These sea salt caramels, adapted from a recipe found here, remind me so much of that popcorn, but a hundred times better. They are buttery and rich with just the right amount of saltiness to enhance the sweetness of the creamy caramel. 


They are a little bit addictive, but luckily they look really pretty all wrapped up in parchment paper, so you can give them away to friends or guests before you devour them all. I plan on having a platter of them set out for our Thanksgiving/ early Christmas dinner that we are having this week. Hopefully they last until then!


Sea Salt Caramels

Ingredients
1 cup thickened cream, or heavy cream

5 tbs unsalted butter, cut into cubes
1/2 tsp vanilla extract
1 tsp sea salt, plus extra for garnishing
1 1/2 cups sugar
1/4 cup glucose syrup, or corn syrup
1/4 cup water

Method
1. Fully line an 8 inch baking dish with lightly oiled parchment paper.
2. Boil cream, butter, vanilla and sea salt in a saucepan, then remove from heat and set aside.
3. Bring the sugar, corn syrup, and water to a boil in a large pan on medium high, stirring until sugar has dissolved.
4. Without stirring, continue boiling until the sugar mixture has turned to a golden amber colour.
5. Slowly pour in the cream mixture, stirring as you pour. Be careful as the caramel will bubble up and it is VERY hot.
6. Continue stirring the caramel for 15 minutes, or until your candy thermometer reads 245 degrees Fahrenheit. Carefully pour the caramel into the greased baking pan and cool for 2 hours.
7. Sprinkle sea salt on top of caramels, cut into small squares, and wrap with parchment paper, wax paper, or cellophane. 

Monday, November 21, 2011

Summer Pork Salad with Peaches and Orange Vinaigrette


Melbourne can get pretty hot in the summer. A few years ago there were about 4 days in a row that temperatures hit between 105-115 Fahrenheit, or 40-44 Celsius. When it gets like that, I can hardly manage to do anything, let alone cook.

So with the weather warming up I've been making a lot of no fuss light meals to get us through the hot nights. Most of our meals have been consisting of simply prepared steaks with large salads, like this pork salad I made for dinner last night. It's easy, full of seasonal flavours, and it's really healthy for you too! Each serving is only about 320 calories and contains a good amount of protein, veggies, and fruit. The tangy orange-mustard vinaigrette is balanced by the sweetness of the peaches, and it will leave you feeling satisfied on those hot balmy summer evenings.


Summer Pork Salad with Peaches and Orange Vinaigrette 
Serves 2

Ingredients
350 grams lean pork fillet
juice of 1 orange, freshly squeezed
1 tsp orange zest
1 tbsp mustard (yellow, mild english etc)
2 fresh peaches, sliced
2 cups mixed lettuce
10 cherry tomatoes
1 small cucumber, sliced
black pepper, season to taste
sea salt, season to taste
Spray of olive oil

Method
1. Heat a non-stick frying pan on medium-high heat. Spray lightly with olive oil, and place the pork fillets into the pan. Sprinkle with salt and pepper, and cook for approximately 8 minutes, or until cooked through.
2. Meanwhile, combine the juice and zest of the orange with the mustard and mix until smooth and blended. Spoon a small amount of vinaigrette over the pork fillets and cook for a further 2-4 minutes. Remove the pork from the pan and allow to rest.
3. Place sliced peaches into the pan and grill for 2-4 minutes, or just long enough to warm the peaches.
4. Add lettuce mix, cherry tomatoes and cucumber to bowls and place warm peaches on top. Slice the pork fillets and divide evenly between the bowls. Drizzle remaining vinaigrette over the salads, and season with a pinch of black pepper.

Tuesday, November 15, 2011

Best Ever Chocolate Chip Cookies


Okay okay, so I haven't posted an entry in forever, and I definitely didn't mean to be away this long. I've been busy with my trip home to NY, working extra hours at work, a Halloween zombie march and loads of other things that I won't bore you with, but I'm back now!
 

I could not fight the urge to bake any longer, and I had a baking marathon yesterday to test out some recipes for Christmas goodies. (Before you get all worked up that it isn't even Thanksgiving yet, just know that I believe as soon as Halloween is over, it's time to put the tree up. Oh yes. I'm one of those people that listen to White Christmas in June.) My all day bake-a-thon resulted in some horrible fudge (it all stuck to the pan! grr!), some okay peanut brittle, and the most amazingly delicious, super soft yet crunchy and flavourful chocolate chip cookies I have ever eaten in my life.


I am not exaggerating. 


These cookies would be a part of my last meal, that is how good they are. I wish I could take credit for the recipe behind these heavenly morsels, but I've adapted it from here. I've really only changed the amount of vanilla (1 tablespoon is waaay too much vanilla for me) and a few other small details. When I make these cookies again (which will probably be as soon as I run out of my current ones) the only thing I would change is to double the recipe. With this recipe you'll get about a dozen and a half large cookies, which is good, but you'll end up wishing you had made more. Trust me.

I can't quite figure out why this recipe is so much better than others. I think it may have to do with the fact that there is more brown sugar than white, which gives them a lovely deep caramel sugar flavour. Or it could be the extra egg yolk that is thrown in. Most recipes I've tried or read usually only contain 1 egg and equal amounts of the 2 sugars, or no brown sugar at all. 

Last time I made chocolate chip cookies they were a disaster. I had followed a recipe off some site I can't remember, and the cookies came out cakey and chewy like a sponge with a weird after taste. See, my idea of the perfect choc chip cookie is one that has a slight crunch, with a moist and soft middle, full of chocolately goodness, and beautifully golden and buttery on the bottom.


And if you follow this recipe, that is exactly what you will get! Just remember to double up the ingredients if you want extras to give away as gifts for the holidays. Or you could just keep them for yourself. I won't judge you.


Best Ever Chocolate Chip Cookies
Makes approximately 18 cookies

Ingredients

2 cups plain flour
1/2 tsp salt
1/2 tsp baking soda
3/4 cup unsalted butter, melted
1 cup brown sugar, packed
1/2 cup white sugar
1 tsp vanilla extract
1 egg
1 egg yolk
2 cups chocolate chips

Method
1. Preheat oven to 165 degrees Celsius or 375 Fahrenheit. Line cookie sheets with parchment paper.
2. Sift the flour, baking soda, and salt into a bowl. Set aside.
3. In a large bowl cream the butter and sugars together until blended. 

4. Beat in the egg, egg yolk, and vanilla until mixture turns light and creamy.
5. Mix in the dry ingredients and chocolate chips with a wooden spoon until well combined.
6. Roll the dough in your hands to form golf ball sized dough balls. Place on lined cookie sheets 2-3 inches apart.
7. Bake for 15-20 minutes, or until the edges of the cookies have begun to turn a light golden brown. They are done when the edges feel firm and the middle is still soft. Don't over-cook!
8. Leave to cool on the cookie sheets for 5 minutes, and then transfer to wire racks to cool completely. 


Sunday, October 2, 2011

Easy Chocolate Brownies


My husband and I are flying to New York tomorrow to visit friends and family, and I'm so excited! (Although I'm totally not looking forward to the 30+ hours of flying. Yuck!) I only get to go home about once a year, and last time we were in New York we were getting married! I'm looking forward to catching up with everyone, going to a wedding, and of course enjoying the beautiful Autumn weather and food.

To get ready for our trip we've been cleaning up the apartment and trying to be as organized as possible. I was going through the kitchen pantry and getting all my baking supplies sorted when I found 3 half used bags of brown sugar. 2 of the bags were almost empty, and one still had a fair amount left. I have absolutely no memory of buying 3 different bags of sugar, but obviously I have a problem because I also discovered about 5 other bags of various types of sugars, and 2 different cans of cocoa powder. Maybe I subconsciously think there's going to be a surprise bake off and I need to be prepared with an industrial amount of every sugar ever invented? I honestly don't know. I do know that I had lots of sugar, cocoa powder, 2 eggs, and a half cup of butter left in the fridge, and what better way to use it all up than by making brownies?


Before baking batter.... and after!  

These brownies are super easy and you only have to dirty 1 bowl, which is perfect if you don't want to create any messes before going on holiday. The key to getting them gooey and yummy is to not over bake them. When you take them out, they should have a "skin" on top and be springy to touch, but do not rely on the old 'clean knife' trick. You want them to be a bit under cooked, because as chocolate cools it firms up. So if you bake your brownies too long you will end up with chocolate flavoured bricks. Also, try to use the best quality chocolate you can get. I like using Lindt 70% dark chocolate, but you can use milk chocolate or chocolate chips if you prefer.


Nutritional Info (per brownie): 164 Cals, 8.6g fat, 24.8g carbs


Easy Chocolate Brownies
Serves 16

Ingredients
3/4 cup self-raising flour
1/2 cup sugar
1/2 cup brown sugar
1/2 cup melted butter
1/4 cup cocoa powder
2 eggs
100g good quality chocolate (I used 70% dark Lindt)


Method
1. Preheat oven to 175 degrees Celsius or 350 degrees Fahrenheit.
2. Sift the flour, sugars, and cocoa powder together in a bowl until combined.
3. Add butter and eggs and mix thoroughly. Batter should be semi thick and a fudgey consistency.
4. Scoop batter into a well greased 22 cm or 9 inch square dish and smooth until evenly distributed.
5. Break chocolate into small pieces and scatter across the surface of the batter.
6. Place in the oven for 25-30 minutes. Brownies should look a little under cooked, but they will get harder as they cool.

Best eaten while still warm and gooey with some ice cream or fresh berries.


Wednesday, September 28, 2011

Three Cup Chicken


My husband and I have been living at our current apartment for over two years and not once has it occurred to me to start a herb garden. We don't have any land with our apartment but we do have a north facing balcony that gets plenty of sunshine.

While I was at the shops a few weeks ago I had a revelation: packaged parsley cost $2.99 while a potted plant was only $3.49. For 50 cents extra I could have my very own fresh plant and avoid buying a large amount in a package that would just get wasted anyways. What haven't I started a garden sooner???

So I've been slowly collecting various herbs and veggies and growing them on our balcony, and so far we have parsley, mint, thyme, basil, spring onion, rosemary, tomato, cos lettuce, and lavender. I've been having a blast gardening, and yesterday I went down to our local plant shop to pick up a few more pots. As I was leaving, the shop owner asked me if I'd like some free Thai basil, as he had too much and needed to get rid of it. I've never even heard of it before, but of course I took some home and immediately started looking up recipes.

Thai basil is completely different to basil, and it has a sweet licorice flavour to it. It's used quite often in Asian dishes, and after some searching I found one that looked super yummy and would use up a fair amount of my Thai basil.

This three cup chicken recipe is very simple and quick, and most importantly full of flavour. (It's called 'three cup chicken' because of the equal parts of soy, dark soy and wine.) The key to getting the chicken soft and tender is to use baking soda. After you have cut up the chicken thigh into bite size pieces, sprinkle a good amount of baking soda over the surface of the meat and place into the fridge for 15 minutes. This simple step makes the chicken so tender it will melt in your mouth! You can use this trick for pretty much any meat, just be sure to rinse all traces of baking soda off of the meat before cooking, otherwise it won't taste very nice.

Some of the other ingredients, such as the Chinese rice wine or the dark sesame oil may not be available at your local supermarket, but if you live in a city, try going to an Asian grocery store. Most will have all of these ingredients, or they will know where you can find them. Finally, do not substitute the Thai basil for regular Italian basil. It won't work and the taste will be completely off.


Three Cup Chicken
serves 4

Ingredients
500 grams or 1lb boneless skinless chicken thighs
5 slices of fresh peeled ginger
5 garlic cloves, peeled
2 tbs dark sesame oil
1 1/2 tbs soy sauce
1 1/2 tbs sweet dark soy sauce (also known as Kecap Manis)
1 1/2 tbs Shaoxing wine (also known as Chinese rice wine, or Chinese cooking wine)
1 tbs water
A large handful of Thai basil leaves
1 tbs baking soda (to tenderize chicken)
Cooked rice, to serve

Method
1. Cut up the chicken thighs into bite size pieces and rub generously with baking soda. Place into a bowl, cover, and put into the fridge for 15 minutes.
2. Remove chicken from the fridge and completely rinse off the baking soda with cold water. Pat chicken dry and set aside.
3. Heat a wok or deep frying pan on medium high heat and add the sesame oil. Add the garlic and ginger and cook, stirring, until fragrant (1-2 minutes).
4. Add the chicken and stir to coat with the oil.
5. Add the soy sauce, dark soy sauce, wine, and water and stir well to combine. Cover, and leave to simmer on a lower heat for 5-7 minutes.
6. Add fresh Thai basil leaves and stir for a further minute.
7. Serve immediately on a bed of steamed rice.

Wednesday, September 21, 2011

Nana's Pumpkin and Walnut Bread


One of my favourite childhood memories is going to my Grandma's house. Nana, as I used to call her, would always have something delicious baking or a plate of fresh cookies waiting for me. I was so excited whenever I got to help her bake, whether it be rolling out cinnamon buns or gathering blackberries for a pie. And of course, anything Nana baked was always perfect.


When my Nana passed away her recipe book was given to my Aunt, and I've recently received a photocopied version of it. It's full of handwritten recipes for baked goods, quick and easy dinners, side dishes, fried pastries and everything else. Some recipes I can remember her baking and some I can't, but they all sound amazing anyways and I'd love to eventually attempt each one.

This pumpkin bread recipe is taken directly from my Nana's recipe book, just as she had written it (I've only added directions). She doesn't specifically say what type of nut to use, but it most likely would have been walnuts. Also, we don't have canned pumpkin here in Australia so I've made my own puree, which is very simple (directions below). This bread is moist and full of flavour, and tastes even better while still warm with a generous spread of butter.


Ingredients
1 cup brown sugar
1/2 cup white sugar
2 cups plain flour
1 tsp baking soda
1/2 tsp nutmeg
1/2 tsp cinnamon
1/4 tsp ginger
1/2 cup walnuts, roughly chopped
1 cup pumpkin puree (fresh or canned)
1/2 cup vegetable oil
1/4 cup water
2 eggs, lightly beaten

Method
1. Preheat oven to 175 degrees Celsius, or 350 degrees Fahrenheit.
2. Sift together all dry ingredients into a large mixing bowl.
3. Add the chopped nuts and stir to combine.
4. Add pumpkin puree, oil, water and eggs to the dry ingredients and mix until well incorporated.
5. Pour pumpkin batter into a lightly greased bread pan and bake for 60 minutes.
6. Serve warm with a generous amount of butter.

To make your own Pumpkin Puree
1. Chop or peel away pumpkin flesh from the outer skin. Remove and discard pulp.
2. Boil in a pot of water until pumpkin is soft.
3. Drain the pumpkin. Return to the pot and mash until smooth.

Sunday, September 18, 2011

Buttermilk Pancakes with Apple Cinnamon Syrup


Autumn has come to the northern hemisphere, and although I'm down in Australia where it is currently spring, I find myself longing for the crisp days, brightly coloured trees, and delicious apple cider that comes with my favourite season.

I'm originally from upstate New York, and while we do get a few coloured trees here in Oz, nothing compares to autumn back home. I could go on and on about pumpkins, hay rides, foliage, and pumpkin spice lattes, but what I really miss is the amazing food that Fall brings. Pumpkin pie, cinnamon sugar donuts, fresh corn and squash, and my favourite; apples of every variety and colour picked fresh from the tree. 

Besides pumpkin, apple is the flavour of the season in my opinion. And as the days get colder and shorter, I can't think of a better way to start a September Sunday morning than with a plate of hot buttery pancakes drizzled in sweet apple cinnamon syrup.

I got the idea for the apple syrup from a poached pear recipe that I made a few months back. When I had finished poaching the pears, I had almost a full cup of beautiful pear flavoured syrup left over. I thought I'd give it a try with apple juice, and luckily on my first try it turned out super yummy. It tastes like hot apple pie filling, and goes perfectly with a buttermilk pancake recipe I found here.

I suggest making the syrup ahead of time, like the night before, so it has some time to thicken up. I added a few apple slices to my syrup while it was boiling and removed them as they softened, and used them to top the pancakes for some extra apple goodness.


Ingredients

Apple Cinnamon Syrup (Prepare in advance)
2 cups apple juice
1/2 cup water
3/4 cup sugar
1 tsp cinnamon OR 1 cinnamon stick

Buttermilk Pancakes (makes approx. 20)
3 egg yolks
3 egg whites
2 cups buttermilk
1 tsp baking soda
2 tsp baking powder
1 and 1/2 cups plain flour
1/2 tsp salt
1 tbs sugar
3 tbs melted butter

Method
1. Add apple juice, water, cinnamon and sugar to a small saucepan and place over a high heat.
2. Bring contents to a boil and let simmer for 5 minutes.
3. Reduce the heat and gently simmer uncovered for 20-30 minutes, or until liquid has reduced by more than half.
4. Remove from heat and pour syrup into a small syrup jug or glass. It will look a bit runny.
5. Leave to cool/ thicken for a few hours on the counter, or place in the fridge to speed up the process. Stir occasionally.
6. Serve over hot pancakes.

For the Buttermilk Pancakes
1. Beat the egg yolks until pale, then beat with buttermilk.
2. Add the melted butter and mix to combine.
3. Sift in dry ingredients and mix until the batter is smooth.
4. In a separate bowl, beat egg whites until stiff peaks form.
5. Gently fold egg whites into the pancake batter with a spatula until completely combined.
6. Leave batter to rest for 15 minutes before cooking.
7. Heat pan or griddle to medium high and lightly grease with butter.
8. Ladle pancake batter onto hot pan and cook until small bubbles form on the top and the edges have started to crisp up.
9. Flip pancake over and cook the other side until light golden brown.
10. Serve hot with butter and apple cinnamon syrup.

Friday, September 16, 2011

Two Minute Berry Ice Cream


Jamie Oliver is one of my favourite chefs for many reasons. For one, he makes fantastic dishes that are so simple and fresh and yummy, and in most cases, healthy. What's not to love about that?


I recently picked up his latest cook book, Jamie's 30 minute Meals, which shows you how to prepare a full meal including sides and dessert within 30 minutes or less. It's so easy to follow and the variety of meals would satisfy any home cook and their family. The photos in the book are just gorgeous to look at as well and include some set by step shots, which is handy.

One of my favourite recipes from the book is Jamie's berry ice cream. There's only four ingredients, it takes about two minutes from start to finish, it's healthy, and can be used for dessert or a refreshing breakfast. It's my go-to recipe for a quick after dinner dessert that's light and easy, and it looks pretty too!


Two Minute Berry Ice Cream

Original recipe from Jamie's 30 Minute Meals
Serves 4

 
Ingredients
500 grams of frozen berries (raspberries, blackberries, and blueberries work well)
500 grams plain or vanilla low fat yogurt
4 tbs honey
a few sprigs of fresh mint

Method
1. Place 4 glasses or small bowls into the freezer to chill.
2. Put yogurt and honey into a food processor and mix for 5 seconds.
3. Add frozen berries and a few mint leaves and process until smooth and combined.
4. Pull glasses out of the freezer, fill with berry ice cream, garnish with mint and serve.

Nutritional Information (Per serve)
Calories: 204
Fat: 2.6 grams
Carbs: 40.1 grams
Protein: 7.6 grams

Wednesday, September 14, 2011

Chicken and Chorizo Paella


I first heard about paella (pronounced pah-A-yah) in my Spanish class in high school. I hadn't given it much thought since then, until recently when I rediscovered it while walking around my neighborhood. I could smell something delicious and rich, a complicated scent that left my mouth watering and my stomach growling. I soon came upon a Spanish tapas restaurant called Basque, and in their open entrance was a giant black pan of paella. It looked amazing. It was full of yellowish rice, oysters, calamari, and various vegetables. I wanted badly to stop and try some, however I went on my way and soon forgot about paella.

A Spanish cooking show came on TV a few nights ago and they made two different authentic paellas: a wild rabbit and snail dish, and a chicken and chorizo one. Of course I didn't write any of the recipes down, but I knew the basics and was now determined to make my own paella.

Do you think I could pay my college loan off with this?


A few tips I learned from the show:

  • The rice should be soft but not creamy. Some pieces should still have a bite to them.
  • Use the best possible ripe tomatoes you can get, preferably from a garden.
  • NEVER ever stir a paella after the rice goes in (some don't stir at all).
  • Saffron, which is essential in a paella, is EXPENSIVE. In fact, the most expensive spice in the world. 


So I scraped together some money for the saffron and my other ingredients and set to work creating my paella. It only took me approximately 1 hour from start to finish (not counting infusing the saffron) and surprisingly it is quite low in calories (only 400!). Also, it is one of the most amazing things I have ever made, EVER. Seriously, my husband and I ate the left overs soon after we finished our dinner, it was that good. The dish is perfect on its own and quite filling, however some nice fresh bread would go well if you are after a bigger meal. Enjoy!


Nutritional Info (per serve): 400 cals, 18.5g fat, 24.1g carbs, 24g protein, 600mg sodium

Chicken and Chorizo Paella
Serves 4

Ingredients
2 cups chicken stock (salt reduced if possible)
½ cup dry white wine (I used chardonnay)
1 pinch saffron threads
1 tbs extra virgin olive oil
2 small chorizo sausages, thinly sliced
4 boneless skinless chicken thighs, cut into chunks
1 brown onion, finely chopped
1 red capsicum (pepper), finely chopped
1 green capsicum (pepper), finely chopped
2 ripe juicy tomatoes, roughly chopped
8 small button mushrooms, sliced
3 cloves of garlic, crushed or finely diced
2 tsp sweet smoked paprika
1 cup bomba calasparra rice (arborio or risotto rice can be used)
1 extra cup chicken stock (see step 10)
cracked black pepper, to taste
Pinch of fresh parsley for garnish

Method
1. Heat ¼ cup chicken stock in microwave until boiling (about 30 seconds).
2. Snip the saffron threads in half with scissors and place into hot chicken stock. Cover and leave to infuse for 1 hour.
3. Pour saffron infused stock, chicken stock, and white wine into a saucepan and bring to a boil. Remove from heat and set aside.
4. Place a large frying pan or paella pan over high heat. Add the chorizo and cook 3 minutes or until golden. Remove from pan and set aside on a plate.
5. Add olive oil and chicken to the pan. Cook until browned, then transfer to plate with the chorizo.
6. Add onions and capsicum and cook, stirring, until onion softens.
7. Place tomato, mushrooms, and garlic in the pan. Add paprika, stir, and cook for 1 minute further.
8. Add chorizo and chicken back into the pan and stir to combine.
9. Sprinkle the rice evenly over everything, gently stir, then add the hot saffron wine stock. From this point onwards, do NOT stir the paella. This will help it to form the yummy soccarrada, or crust.
10. Bring to a boil, then reduce heat and let simmer uncovered for 20 minutes. Add extra chicken stock every few minutes as needed for the rice to absorb.
11. Remove from heat. Season with cracked pepper and garnish with fresh parsley. Serve immediately with your favourite white wine.


Que delicioso! 

Tuesday, September 13, 2011

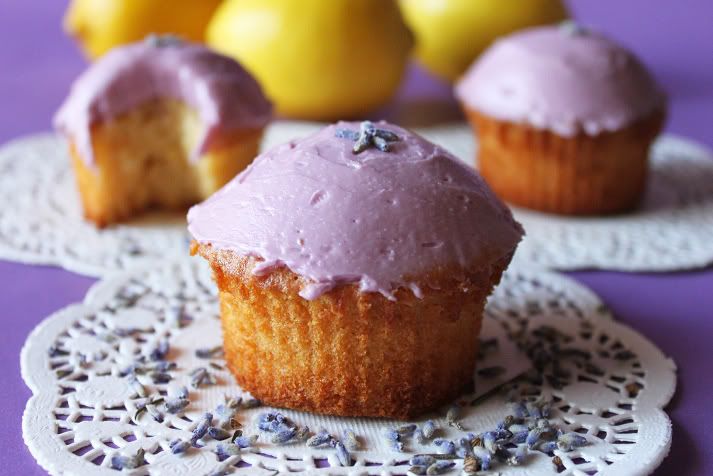
Lemon, Ginger and Honey Cupcakes with Lavender Buttercream Frosting

Photobucket

I can't think of a better way to start off my brand new blog than with a cupcake recipe!

I had been dreaming of making a lavender infused dessert ever since my husband and I took a trip to the Ashcombe Lavender Maze back in February. We stopped there for tea, and they served us these delicious little butter cookies with chunks of lavender all throughout. I had never thought of eating lavender before, and I was a bit hesitant at first, but the flavour is SO unique and delicate and just sings of spring time.

Photobucket

While shopping at the markets a few days ago I spotted some culinary lavender buds and immediately set to work creating a recipe. I love the combination of lemon, honey and ginger, so after a few adaptations from a buttercake recipe found here, I had some lovely springtime cupcakes that are soft and buttery, and so delicate and light! The ginger compliments the lavender so well, and I'm very pleased with the results. I think in the future I may add a bit more ginger (just because I love it). The recipe is below, and you can make it into a cake as well if you prefer. Simply just use a 9 inch round pan and bake for a further 20-25 minutes.


Ingredients

Cupcakes
225 grams butter
130 grams + 45 grams caster sugar
2 tbs honey
Zest of 1 large lemon (or 2 small lemons)
2 tsp ground ginger
5 egg yolks
200 grams plain flour
1 ½ tsp baking powder
5 egg whites


Lavender Buttercream Frosting
200 grams butter, softened
2 cups icing sugar (powdered sugar)

½ cup whole milk
1 tsp lavender buds, or culinary lavender
Purple food colouring (gel or powder)

Method
1. Preheat oven to 160C. Line a cupcake tin with cupcake papers.
2. Beat the butter, 130 grams sugar, honey, zest, and ginger on medium speed for 5 minutes.
3. Drop in egg yolks one at a time, beating well after each addition.
4. Sift flour and baking powder and mix into the batter.
5. In another bowl, beat egg whites until foamy. Gradually add in 45 grams sugar and beat until stiff glossy peaks.
6. Gently fold egg whites into batter, making sure to incorporate everything without over mixing.
7. Spoon cupcake batter into paper filled tins until ¾ full leaving a small space at the top for cupcakes to rise.
8. Bake for approximately 20 minutes or until toothpick comes out clean and cupcakes are a golden colour.
9. Let the cupcakes rest in the tin for 5 minutes, then carefully remove and place on wire rack to cool.


For the Lavender Buttercream
1. Place ½ cup milk into a small saucepan with lavender and bring to a boil. Remove from heat.
2. Cover the pan and let it sit for 15 minutes so that the lavender infuses with the milk.
3. Pour lavender milk into a cup and place in the refrigerator for a further 30 minutes to cool.
4. Remove milk from refrigerator and strain to remove lavender buds. Set milk aside.
5. Beat butter and sugar together until the butter starts to turn a creamy ivory colour (approx. 5 mins).
6. Add half of the lavender milk and purple food colouring and mix to combine.
7. Taste frosting; add more lavender milk or sugar if needed.
8. When cupcakes have cooled, frost generously with lavender frosting. Enjoy with some Earl Grey tea... yummy!